Showing posts with label art. Show all posts

Friday, April 20, 2012

Friendly Friday

Hello, dear friends. I'll update you soon on my happenings and non-happenings, but in the meantime I have another "Friendly Friday"  for you.

Terry is a dear family friend, a mentor in womanhood, who continues to inspire me with her intentional and artistic endeavors. This post has been long in coming, so I'll just give you what she sent me:


A luna moth quilt!

Terry writes:


For a long time (decades) I have wanted to make pictures out of fabric. Until three years ago, I had no idea there was such a medium as "art quilts." I began taking a class here and there to gain some basic skills and learn what others were doing. When I found a 4-day workshop on making pieced art quilts, and I knew this was how I wanted to work. The luna moth is the first art quilt I made with these new skills, following the instructions of my talented teacher, Sheri Alcorn.
 
It is based on a photograph, but the design, piecing, and quilting are all my own workfrom selecting fabrics to adding original appliqued "eyes" and antennae. How can I describe the fulfillment I experienced as I worked with hundreds of tiny pieces to create what had been latent in me for so long? I enjoyed the process of abstracting the photo, cutting and piecing original patterns to fit my design, adjusting color choices as the moth began to take shape on my sewing machine. The pieced design was finished in four intense days of class time, but the finishing (adding a back, quilting, binding, and applique) took me several months more. Each step was a little scary: What if I did something that "ruined" my work? Would I still like my quilt if my novice skills did not match my aspirations? The outcome has been a delight to me and to my family for years now, and I have made two more quilts since then.
 
The most valuable lessons I learned from making this first quilt are these: It's never too late to learn something new. (I'm 50-something!) Taking a class does not negate creativity; it empowers it. Learning by doing is the only way to master a skill, so just do it!


Thanks Terry!

Friday, March 30, 2012

Friendly Friday: Chainsaw Art

One of my co-workers, Mike, paints old chainsaw bars and crosscut saws as a hobby. I commissioned a saw for the boyfriend, since he used to lead a chainsaw crew. With a little brainstorming, Mike and I came up with the concept of a vista over Lake Tahoe. I think he did a spectacular job.


The boyfriend loves it too. 

Friday, March 2, 2012

Stationary Dabbles

Last summer I had the opportunity to take a paper making class. If you ever get such an opportunity, seize it. Paper making is like yoga, except more relaxing. I loved it. And bonus, it left me with a stash of home made recycled paper.  When recent events called for a few thank you gifts, I turned to my paper supply and some inspiration from Alex and Lauren.  I made two sets of animal silhouette stationary. Fitting for two biology professors, don’t you think?

IMG_3090

IMG_3093

And seriously, go check out Alex and Lauren. I glean a fair amount of awesomeness by association from those two.

Sunday, February 12, 2012

Third Time’s the Charm

…aka coffee table re-do.  As with most of my furniture, I inherited my coffee table from some friends. At the time, the coffee table was a significant improvement from the Rubbermaid bins that previously served as a footrest/coffee table surface.
IMG_2788
After a while, however, the worn state of the coffee table just wasn’t doing it for me.
IMG_2790
I really liked the texture of the table top, so when I was brainstorming up-cycle ideas, I wanted to keep this principle in play. My first idea was to use PVC pipe to make a surface, akin to Alicia’s mirror or Mandy’s dresser. I guess I should have been wary when everyone I told about this idea was skeptical. The boyfriend even (lovingly) refused to do this project with me. 
Round One:
I forged ahead anyway, and 40 feet of PVC later combined with 20 minutes with a rotor saw left me with this:
IMG_2791
Hello my pretties!
Anyway, I got right to work laying out the PVC inside the newly deconstructed and painted coffee table frame. This blue-gray color is another treasure from the the “oops” paint section.
IMG_2795
At this point, the coffee table is upside down with some scrap boards underneath to support an even lay of the pipes. So far, so awesome, right? I was having visions of an epic brag blog at this point. But pride comes before the fall, my friends. The idea was the glue the pipes together with a high strength epoxy and between the tension and the glue there wouldn’t be any need a base support. The guy at the hardware store (reluctantly) recommended an epoxy, so I went to town. In an attempt to make a uniform pattern, I worked from all four sides inward. And, to my utter dismay, I ended up with this:
IMG_2808
A mid-table gap. Bad news bears. I am not quite sure how this worked out, since it all fit perfectly when I did the dry run.
So round one, fail. I can speak to the strength of the epoxy, however, since it took a hammer to crack out the pipe slivers when I went to break them out.
Round 2:
Next thought was the painted wood grain plywood table top. The best example is Mandy’s lamp shade (minus the glitter).  My landlord generously showed me how to use his fancy table saw so that we could get straight cuts for plywood piece. However, three seconds of the plywood placed in the table frame told me round two was a no go.
IMG_2810
Round Three: Fence Fence Planks
My next idea was to use some old fence planks from my landlords’ fence (lucky for me, they are extremely generous with their tools and old materials). Fortunately, they were the perfect length for the coffee table. With my newly acquired table saw skills, I took a bit off the sides. Then it was a matter of nailing the boards together. I wanted to keep the rustic nature of the planks, so I just did  a quick sand to remove splinters and then used a gray wash (gray paint + water) to antique the color a bit. Two coats of polyurethane, and ta-da! I am in love.
IMG_2821
This was by far my most time consuming and expensive failure. Fortunately, the final fix was free and perfect. In retrospect, the table now reflects the style of the house more than the PVC table would have. I do have a box full of PVC slivers and a large piece of plywood at my disposal now. Napkin rings for all?
In conclusion, this table is the poster child of the iterative creative process and how it behooves the artist to be flexible and generous to the inevitable flops that may precede the final beauty.
IMG_2820

Sunday, February 5, 2012

One Year In

I have been living in Winnemucca for over a year now, which sets the record for the longest contiguous stay in one place since I was sixteen. Overall, it has been a good year. I have thoroughly enjoyed nesting and exploring my creative horizons. Professionally, Winnemucca has brought numerous opportunities and challenges which have led to some stress but ultimately, great fulfillment.  Living in a small town is wonderful when you want to commute to work in under three minutes, walk to every conceivable location, and enjoy a quieter lifestyle. But with this comes the limitations of breaking into a community that is either highly transient (I have now been in Winnemucca longer than half of the employees at my office) or completely entrenched (half of those who have temporal seniority on me have been here for 15+ years, if not their whole lives). It is an awkward place to be as a twenty something in a long distance relationship. While I have not given up on a rewarding social life, most of my rejuvenation and outside of work activity revolves around the art projects that I produce. I am so grateful to have the tools and time at my disposal to learn new skills. I am also deeply thankful for those of you who read my blog and provide a community, albeit a virtual one.  I am not writing this to whine, but to be honest and dispel any illusion of perfection in my life.
And while we’re on the theme of imperfection, I thought I would give you a little house tour. I did not clean up in advance, and the photography is far from ideal. I love this house. As with my personal life this place has come a long way, but is still a work in progress.
Here is the dining room in 2011:
IMG_1342
And in 2012:
IMG_2798
The camping table, and first roommate are gone. The deceptively comfortable white chair is now in the room of Roomie #2.  Yes, that is a tequila bottle covered fake plant in the corner. It does not belong to me, if there were any questions. Let’s play ‘I Spy that Project’:
    1. Suitcase stool
    2. Half finished dining table set. The table used to be the yellow oak color of two of those chairs. Eventually they will have the walnut/white combo.
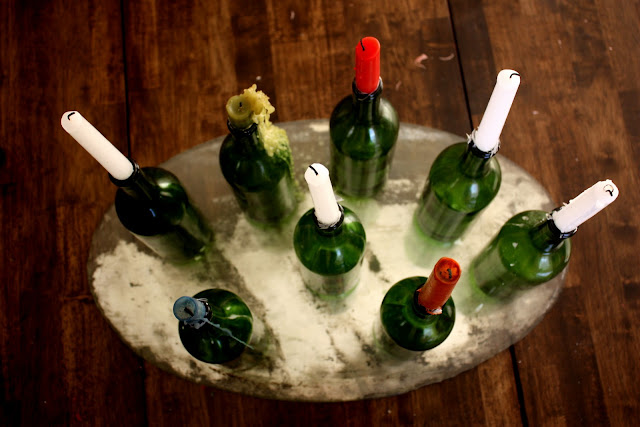
    3. Vintage mirror from my Christmas candle display.
Ok, not much going on in the dining room. On to the living room.
2011:
IMG_1340
2012:
IMG_2800
In the living room, let’s spy:
      1. Brand new fake fire place/gas heater.
      2. The other half of the Christmas candle project.
      3. The desk turned cabinet. While the construction of the desk is solid, I still am not crazy about the color combination. Furthermore, one of the re-purposed handles fell off today, so I may be back to the drawing board on this one. At the very least, I won’t be sad to part with it if I move away from Winnemucca.
      4. Dr. Suess lamp. Half way through its transformation from your yawn inducing college kid lamp to a more interesting and austere light fixture.
      5. Part of a crocheted rug. Here’s a hint: it won’t end up as a table cloth.
      6. A blank wall, desperate for some Sarah-Do: February art action.
And into the kitchen! This might be my favorite room in the house.
2011:
IMG_1344
2012:
s
I have probably put the most effort into this room, and it is the closest to “finished” as I have right now.  There are now cabinet doors (and drawers!) installed. We also ditched the avocado refrigerator in favor of a more sightly, and most importantly, functional appliance. You will also see:
  1. The hand built kitchen table and chairs that started my DIY frenzy.
  2. Microwave stand that I painted red. I also painted/decoupaged some old oatmeal and spagetti sauce jars to create cheap yet decorative storage containers for my beans, nuts, and other bulk items.
  3. Wine bottle art! I am not sure if I ever blogged this particular installment in which I glued buttons and handmade flowers onto the wine bottles.
  4. A Quagmire Halloween costume. Unfortunately, not mine.
IMG_2803
Here is another view of the kitchen. For your viewing pleasure:
    1. Barnyard bench, designed to contain our recycling.
    2. One moderately contained craft supply corner.
    3. A pumpkin shell turned bowl.
    4. Safety gear. Don’t forget to wear your earplugs and safety glasses!
I don’t have a before picture of my bedroom, but here is how it looks now:
IMG_2846
I Spy:
  1. 2 lamps, halfway completed.
  2. Hand made wall art, never blogged.
  3. My first curtain sewing attempt, crafted from thrifted sheets. All in all, a success. At the time, I did not know the golden rule of curtain hanging: high and wide. Learn from my mistakes, gang.
  4. A mirror, in need of a home on a wall and possibly a home made frame.
  5. 1 slightly tacky throw pillow, that might get a make-over one day.
My bedroom used to be part of the wrap around porch.
IMG_1351
And last, but not least, is me! 90% of my weekends are spent looking like this:
IMG_2813
All this to say, I am not perfect nor am I the perfect crafter. It may look like a half-baked disaster around here most of the time, but I enjoy it, and I hope you do to.Before my projects make it onto the blog they usually sit around incomplete while I wait for the final flourish of inspiration to hit me. Art is messy, but in the mess I find a peace and quiet joy in my life here. And at the end of the day, that is all that matters.

Friday, December 23, 2011

Christmas Crafts


Somehow stillness and simplicity were more important than tradition this year. This candle center piece is the extent of my Christmas decorating, yet its simple beauty and its combination of old, new, and upcycled seems to be a perfect reflection (no pun intended) of 2011.  May your Christmastime be a time of stillness and a reflection of the unique beauties in your own life.

Wednesday, December 21, 2011

Gorgeous


Hand carved spatulas. Gorgeous party favors from our office Christmas party.


Wednesday, December 7, 2011

Collection


In our jars, we hold a mirror of our hearts. Tidbits of this and that, together a beautiful mosaic of where we have been and what we have done. But let us not forget, the true masterpiece is the dynamic canvas of the soul.

Wednesday, November 16, 2011

Art Therapy


To say that, through art, I have found a new strength and vitality within myself is an understatement. Art can be the one of the most vulnerable expressions of self--so vulnerable that sometimes I avoid it. But in those moments of vulnerability, I subconsciously tap into other insecurities and traumas that are somehow able to sort themselves out through the union of colors. It is as if my brain rewires itself through the click of a shutter and all is right with the world again.

Because of this, I found myself deeply resonating with Brian McCarty's War-Toys project. The photography project combines principles of art therapy and toys as children in the Middle East draw pictures of traumatic events in their lives. McCarty, with the child's help, then uses locally available toys to recreate and photograph the scenes.
My rendition of this poignant drawing.